
Sunday, July 28, 2013
1920's Braided Up-do
My serger is still at the repair shop, so I made a little Youtube video as I haven't much else to do. Enjoy!

Wednesday, July 24, 2013
DIY Hat Pin Holder
I have been very busy working on my business. (So far everything that could go wrong has, including my brand new serger breaking. Twice.) I haven't even had time to read blogs, let alone post on my own! But as I seem to have a few minutes today, here is a little tutorial for a hat pin holder. I love how it takes up very little space on my shelf and keeps all my hat pins organized.

You will need:
-Small picture frame
-Scrap of fabric slightly larger than your frame (choose something with a loose enough weave to be able to put the pins through. I used some velvet)
Step 1: Remove glass from frame.
Step 2: Insert fabric into frame. You may need to tape, sew, or glue the fabric to the edges of the backing. (I just squished the fabric between the frame and backing, and it seemed to work fine. Lighter weight fabrics likely wouldn't work as well.
And that's pretty much it. You just insert the pins by pushing them through the fabric.
Saturday, July 13, 2013
Convict 13 Outfit
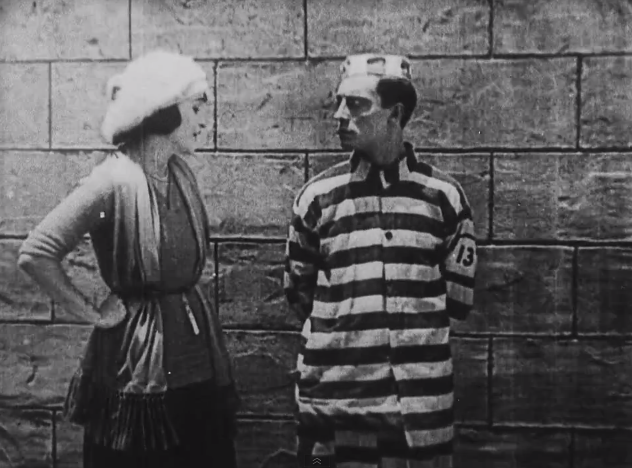
I've been so busy working on sewing blouses for my new Etsy store (hopefully out later this month) and property hunting, that I haven't had much time for anything else. So while I have no outfit photos or tutorials today, I did want to share some outfit screen shots. They are from the 1920 Buster Keaton movie Convict 13. I just loved Sybil Seely's outfit! I quite like the look of the belted scarf and have been wearing it myself a bit lately. Now where can I get a fuzzy beret?


Tuesday, July 2, 2013


Thursday, June 27, 2013
Wigs and Birthdays
It was my birthday a couple days ago. I celebrated with an afternoon in my favourite little town, which was spent browsing the stores and having coffee. When we got back I went to work preparing my birthday dinner. My parents wanted to take me out for dinner, but I just wanted something simple. I had sort of a "tea party" theme and served sandwiches, soup, asparagus, and various homemade cookies and biscuits. The cake I baked was a little disappointing. I have yet to bake a sugar-free cake that rises properly. However I loved the whipped cream frosting I used. Basically I pureed some spinach into whipping cream. It was the most beautiful shade of green and didn't taste like spinach! No really, you couldn't taste it at all. I topped it with edible flowers and chocolate.


We have been cleaning out the house in preparation to move (if we ever find a place *sigh*). The upside of all this work is finding stuff I didn't know we had. One such example is my mom's wig from the 1960's. She bought it while in high school but didn't wear it much. Over the years it was shoved in a drawer and became quite the rats nest. I'm in the process of restoring it, but it is still massively tangled. That didn't stop me from wearing it though! It was sort of fun to have shorter hair for a day. I wore it with my new 1940's inspired gingham blouse.


We have been cleaning out the house in preparation to move (if we ever find a place *sigh*). The upside of all this work is finding stuff I didn't know we had. One such example is my mom's wig from the 1960's. She bought it while in high school but didn't wear it much. Over the years it was shoved in a drawer and became quite the rats nest. I'm in the process of restoring it, but it is still massively tangled. That didn't stop me from wearing it though! It was sort of fun to have shorter hair for a day. I wore it with my new 1940's inspired gingham blouse.

 |
| Catsy needed a hug |


That's All.
Monday, June 17, 2013
Graduation
I'm officially graduated!!
It was a looooonng day, but I'm glad I went to the convocation ceremony. Ok, mainly because I went out for a nice dinner afterwards, followed by antique shopping, but getting my diploma was good too.
I wore my grandmothers dress to the ceremony. She originally wore this dress to my parents wedding. It is from the early 80's, but I love how it looks and it wasn't too heavy under the black gown. After receiving the diploma, everyone also had to wear a "hood", which was basically a ribbon. Can I just take a moment to say what a ripoff that was?! I paid $50 to rent the gown for the day, and had to return the hood afterwards as well. These things were poorly made out of a cheap polyester. I could have made a better one for less money than it cost me to rent it for a couple hours.
My official photos will arrive in the mail sometime in the next few weeks, but here are some my mom snapped before the ceremony.


 |
| In the convocation gown, before the ceremony |
 |
| ALPACA! |
I now have my Bachelors of Mathematics, with a major in Honours Statistics. Feels pretty good to be finally done. I should be looking for a job, but since we are moving it makes it difficult. Hard to apply for a job, when you may be living three hours away in a few weeks. I have been putting my time to good use though. I've started sewing some clothes with my new serger, which will be for sale before the end of the summer. I have yet to decide on a name for my clothing line, but it will be mainly casual wear inspired by the 1920's and the Victorian era.
 |
| My serger! Isn't she pretty?! |
That's All.
Tuesday, June 11, 2013
DIY Elastic Belt
I had a request for a tutorial for the belt I wore in my last post, so here you go:

You will need:
-piece of elastic the same size as your waist (when very slightly stretched)
-clasp
I used a 2" leopard print elastic. My local Fabricland had a few different types of printed elastic, and if you type in "wide elastic" into Etsy you should be able to find some other neat patterns (I saw polka dots and some cute stripes!). You could also use lace or a wide ribbon, but the belt won't hug your curves as well.
For a clasp, you will want something that comes apart into two pieces, and which has a space on either side to attach the elastic to. Make sure the space is the same or slightly larger than the width of your elastic. I used a larger version of this style of clasp. I also saw this cute vintage one on Etsy. Don't buy one that needs to be hand-sewed onto the elastic. Your belt will be less secure and more likely to break. Once again, there should be a selection of clasps at your local fabric store (look where they keep the belt buckles).
Instructions:
Step 1) Fold elastic over one side of the clasp so there is a 1/2" part folded onto the wrong side. Using a zig-zag stitch, sew the edge to the belt. Go over this stitch line a few times, until you are happy with the look.
Step 2) Making sure the elastic isn't twisted, repeat step 1 on the other side.


And that's it! It is really quite easy, and you can have a new belt in as little as five minutes.

Friday, June 7, 2013
Colour Combinations and a New Belt
As a graduation gift, I'm getting a serger!!! I am very excited and can't wait to start playing around with it. I am hoping to eventually be able to maybe sell some of my pieces on Etsy. I have been reading vintage sewing books to get some inspiration for designs and came across this section in a sewing book from 1922. Often illustrations are in black and white, so getting an idea of what colour combinations were popular I found very interesting. Some certainly sound....uhh.... bold.


Speaking of bold, check out my awesome new leopard print belt! I love it! I actually made it myself out of a printed elastic I picked up at the fabric store. I may post a tutorial if anyone is interested.

Hope everyone is having a great weekend!
That's All.
Subscribe to:
Posts (Atom)